Tutorial: Making Danish Pastries
The first time I ever ate a Danish pastry was in Denmark! This was not the typical Danish that you find prepackaged at motel breakfast buffets. It was the real thing. My family was on a camping trip through Scandinavia and we planned to stop in Odense, Hans Christian Andersen's home. The campground was separated into private sites and, once our tent was set up in the tree lined space, the campground hosts asked if we wanted to order pastries for breakfast. We looked at each other, wide-eyed. Who wouldn't want to have fresh pastries for breakfast from the local bakery? I remember sitting the next morning around our camping table, the smell of my mother's fresh coffee in the air, and pastries delivered, still warm. They were the best ever. I dreamed of them enough that fifteen years later, when my daughter's class was studying Denmark, I volunteered to make them, though I had never made them before. And that's how I got hooked!
THE RECIPE
1/2 pound of butter, room temperature
wax paper
2 1/4 c. flour
1/2 c. sugar
1 1/2 t. salt
1 c. milk
2 t. active dry yeast
The day of the morning before you make the dough, cut two pieces of wax paper about 15 to 16 inches long. Lay the half pound of butter, lengthwise on one of the sheets. Cover with the other. Using a rolling pin, slowly flatten and roll into a rectangle 14" x 7". You want it to be thin and even, but not so thin you can see through it. Place the butter in the fridge to harden, at least a good hour.

When the butter is hard, start on the dough. Bring the milk to lukewarm temperature on the stove. It won't take long. Add yeast and stir to dissolve. Meanwhile, mix the flour, sugar and salt in a bowl. When the yeast looks active (it usually takes about five minutes), stir into the flour mixture until it forms a shaggy dough. Dump out of the bowl and knead only until the dough holds together and is no longer sticky.
On a lightly floured surface, roll the dough out into a rectangle 21 " x 8". Remove the top sheet of wax paper from the butter, and put the butter down on two thirds of the dough. Quickly remove the other sheet of wax paper.
Here come the folds. Fold the top third of the dough over half of the butter, and then fold again to cover the butter. Working quickly so the butter doesn't melt out, gently roll out the dough into double its size. Time for the second fold: fold the top third of the dough towards the other side, then fold again. The dough is now ready to go into a plastic bag and into the refrigerator for one hour.


After one hour, turn the dough out of the plastic bag and onto the counter. Work as quickly as you can so the dough will not get too warm. Roll out to triple its size. Fold one third over toward the middle, then the other third over, like you are folding a three-fold letter. Then roll out the dough again. And repeat the folds as above. Now the dough is ready to go back in the plastic bag and into the refrigerator for one hour. It needs to stay cold so that it will maintain the layers of butter you just made!

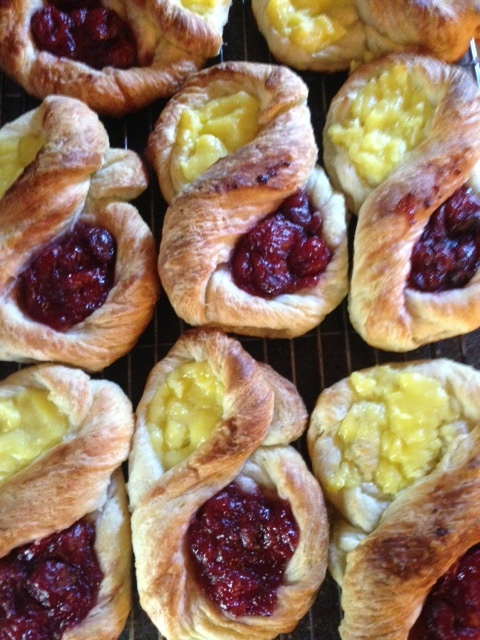
After an hour, take the dough out of the refrigerator and empty the bag onto the counter. Roll out into a rectangle 24" x 6". With a sharp knife or dough scraper, cut the dough into 10 strips lengthwise. Take each strip and twist it. Then make it into a figure eight. Place on a parchment- lined pan. Flatten the indentation gently with your fingers, then fill with desired toppings. I use pastry cream and tart cherry filling. Cover with wax paper and place in the refrigerator until the next morning.

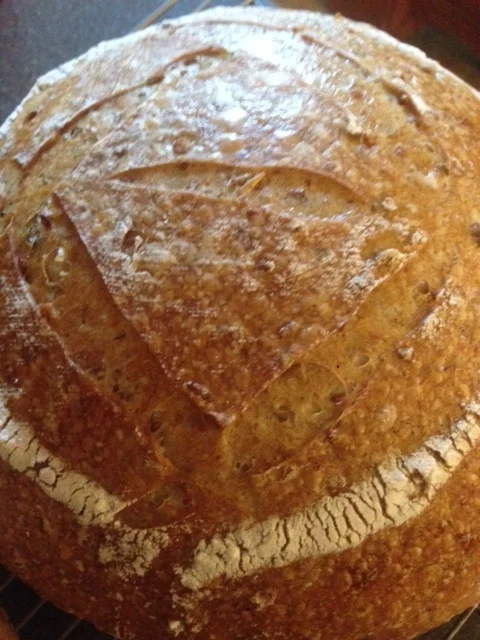
In the morning, take the pan out of the refrigerator. Remove the wax paper. Allow to warm up to room temperature for at least a half an hour. Preheat oven to 400 degrees. Bake for 20 to 25 minutes, turning halfway through the baking and checking for doneness. I take them out when they are nice and golden, like in the picture. Sometimes I drizzle icing on top to make them fancier.
Serve immediately. Enjoy!
(These do freeze well. Take them out of the freezer the night before you want them. Next morning, put them on a pan in a cold oven and preheat to 350 degrees. When the preheating is done, they are usually warm and ready to eat.)

P.S. For those of you who are wondering how to shape this figure eight, I am adding a separate post with the photos.